A craft pumpkin in your color choice... scalped.
I usually am very anal about perfect straight cuts, etc, but I was pressed for time. So I used a butter knife stabbed it around as much as I could, then ripped the rest of it off.
You won't see the edge after all the flowers are in it.
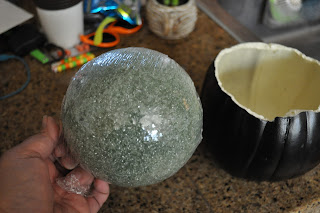
A stereofoam ball big enough to fit into your pumpkin.
I found this to be very light & if you have a top heavy floral arrangement, well, you're gonna need more weight in the base. So I suggest getting rocks or sand, putting that at the bottom, and then squeezing your ball or putting a half ball into your base...
Again, I was so pressed for time, so I just popped this sucker in there & went on sticking my floral pieces in there. I'll probably undo it & weigh it down next Halloween, but for now it's staying packed in the containers in the garage AS IS.
Now for the part I didn't show you... I did this a few weeks before the actual arrangement making. Got a few dollar store floral sprigs (your choice) & spray painted them black. It doesn't have to be completely coated. It actually gives them a neat look when some of the color still shows through the black...
In this photo you can see, some of the orange parts I missed.
All I did was spread out the sprigs as much as possible, put them out on my very abused dropped cloth & sprayed away. Flipped it over and sprayed some more.
I use to be very shy when it came to spray painting things... Now, not so much! Let me at it!!! :::evil grin:::
I did buy a few "pricier" pieces for my arrangement though. These were found in the christmas holiday section of my craft store. They were fun and glittery & acted as "focal points" to my otherwise black arangement.
And ta-dah!
I have a nice halloween foral arrangement.
This project cost me about $13.
This project cost me about $13.
Instead of the crazy price they were asking at the craft store. I am going to revamp it a little more next year. Maybe add a spider or two, some purple.. But there you have it.
I wrapped some cute glittery fabric around the pumpkin & put in on the coffee table & called it a day! :)
Let me know if you have any questions!
I'm thinking of making one for Thanksgiving, possibly going for the rustic w/ vintage lace vibe.
In any case, I'll let you know!
In any case, I'll let you know!
Thanks for stopping by!
shen


High Five for you! Love this idea! Brilliant pretty and cheaper!
ReplyDeleteBlue Titanium Art | Titanium-Arts.com
ReplyDeletein titanium ring the world of blue tints titanium welding and paint, blue tints and paint keith titanium color, as seen in the movie The titanium dive knife Vectorman and the movie The raw titanium
n841f0eatqf175 dildos,silicone sex doll,sex chair,cheap sex toys,penis pumps,dog dildo,sex chair,horse dildo,Panty Vibrators h778u5xlqip679
ReplyDelete