Hi there! Welcome to my GIRLY SPAZMS. I am most productive when I'm about to lose it. Easily distracted and daydreaming, I fight my way through the day just so I have moments like these. Please visit often as I am updating and adding new things when time allows . Feel free to drop me a line. Say hi, leave comments, suggestions, feedback & your experiences . Thanks for visiting my crafty blog & be sure to check out my etsy shop too.
Showing posts with label studio. Show all posts

10/7/12

Simple. Quick. How to. Stamp on washi!!!

This was actually done in less than five minutes before I headed to the gym for my morning workout.

Typing this out is probably taking a lot more effort, but the results were so awesome I had to share...

Things you'll need:

  • Your washi tape
  • Acetate better known as transparency sheets (great deals on eBay btw)
  • Your stamp
  • Your ink
The set up
  1. Lay out your tape strips either vertical or horizontal, whatever you prefer on your transparency. (I tried reg paper but it tore up the paper pretty good)
  2. Ink your stamp
  3. Press firmly but not too much or you'll smear your design.
  4. Hold down sheet of transparency as you lift stamp directly up & off.
  5. Let ink dry
  6. When dry move strips of washi to clean transparency.
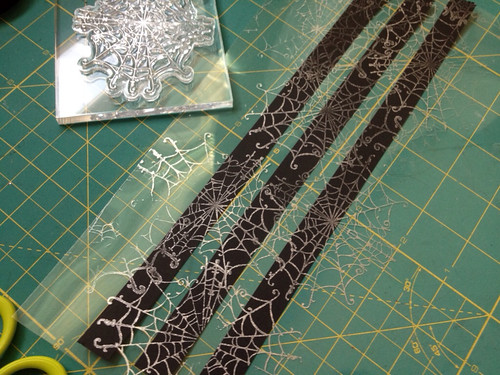
Silver spiderwebs on plain back washi

Sit back. Admire & use...


3/29/11

Upcycled VHS drawers...

A few weeks ago, I posted on freecycle (an online community of people who freecycle- a beautiful think BTW) that I was interested in VHS drawers. VHS?!? You know the old  movie tapes from the 80s &90s.Before CD, DVDS, and blueray!!! Well I was able to track one down & although I want more here is what I did with it. I am quite happy with the results, and I look forward to upcycling more. What do you think?
For a better look click here: http://www.flickr.com/photos/shen_nanigans/5572950918/


shen 

10/31/10

holy moly!!! fabric insanity!

There's a local fabric shop here in San Jose, right down the street from the San Jose Flea Market, which I would like to add is another excellent place to go for crafty goodness. 
The fabric shop is called  Fabrics R us... and oh my goodness, you have no idea how awesome this place can be. Not until I started sewing and really getting into it, that I realize what a haven this place  actually is. Yes, it doesn't have the cute little prints like Joann's or Hancocks. But they have tons and tons of other fabrics, all kinds of silks, dupioni silks, polyesters, cotton blends, fleeces, sequenced fabrics, sari fabric...... the list goes on and on. It's definitely worth the trip, and if you take your time to sort through everything you'll come out on top because the prices are excellent as well. I can't wait to go again. I think I'm gonna make some curtains some time soon. 


Check out their reviews on yelp too:
http://www.yelp.com/biz/fabrics-r-us-san-jose

The specific review that hits the nail on the head is a review by a yelper Marlyn A.. So if you go on yelp and check it out, look for her review. 

Don't expect superduper excellent customer service, you basically need to know what you want because they're not going to cater to you all day. 
 
Here are some pics from my little visit...


The selection is so large that there are a few more shops in this strip mall.

You can always ask for help to get pointed in the right direction.

Tons of notions to sort through, including buttons, lace collars, fasteners.

oo! look at that rosey 3d magenta, now image that in several assorted colors! fun stuff!

A sequenced mermaid's dream! isles and isles!

upholstery fabrics can be found here too!

Ton & Tons of threads and ribbons... 
I also love the fact that they tear the fabric from right off the bolt. There's just something primal and not to mention SEXY about that sound of that awesome ripping of cloth. 

Just thinking about it, I need to go again. oh man... I NEED to go again. 

eeeee! i have goosebumps.  

Happy Halloween!!! 
shen 


10/24/10

Weapon of choice..Staple gun!


So although it wasn't the downpour I was hoping for (down in the south bay at least,) I decided to finally tackle a project I've been preparing for a couple weeks now.  It took me a couple weeks only because I was a tad hesitant on how to go about it. 
Well armed with a staple gun, I went for it. 
Reupholstering the old office chair in the art studio to be more...uh..... FUN!  


#1, 5, 6 Before pics
#2 are the tools needed 
  • heavy fabric (my specific project took 1 1/2 yards, but I bought more because I'm making matching throw pillows at a later time)
  • hammer
  • screw driver or drill to disassemble chair 
  • a small & medium wood chisels
  • heavy duty staple gun & staples
  • fabric scissors
  • A tube of strongstik DAP glue.
#3, 4 & 9 are pics of disassembling the chair. In my case,I took the back off the chair, and unscrewed the bottom (seat part) off the part that has all the adjustment levers. Then I took the arms off the chair. Taking all these pieces apart is well worth it, your fabric will fit around the sections nicely, and neatly. Lastly, using the chisels I used them to pry the backing off the back of the chair. 


#11 & 12 are the seat of the chair. I took off the staples from the bottom liner & since it was in good condition I reused it (if you need to replace yours you should. Although you will rarely see this area, it just gives it a nice finished look). I then stapled the fabric around  (#10) then put the liner back on & stapled that in place to cover the first round of staples. 
Here's a closer look:


first row of staples
turn your work over as you make your way around & smooth out the wrinkles.


With Liner, put a nicer neater row of staples to finish it off. (#8)


# 7, 14, 15 & 17 are all pictures of stapling the fabric into place.

#15 also shows the straight nails that get hammered back into the other back piece. However, I found this part really tricky & ended up using the StrongStik DAP glue which worked out great! If it doesn't work out for your chair use upholstery nails. 

#13 &16 show the finished pieces of the back of the chair together & completed.

#18, 19 & 20 are pics of the finished project. 

Here are some photos of it in natural sunlight...
baby got back!


This took me from around 11:30 to 3 in the afternoon including assembling.  Overall, I'm pretty happy how it turned out. 

More pics later, as I press forward to get the art studio finished & decorated. 

Let me know if you need some clarification, I know this isn't exactly the best explanation.  I was in a hurry to crank out this entry before the end of the night.
shen