Hi there! Welcome to my GIRLY SPAZMS. I am most productive when I'm about to lose it. Easily distracted and daydreaming, I fight my way through the day just so I have moments like these. Please visit often as I am updating and adding new things when time allows . Feel free to drop me a line. Say hi, leave comments, suggestions, feedback & your experiences . Thanks for visiting my crafty blog & be sure to check out my etsy shop too.
Showing posts with label crafty. Show all posts

10/7/12

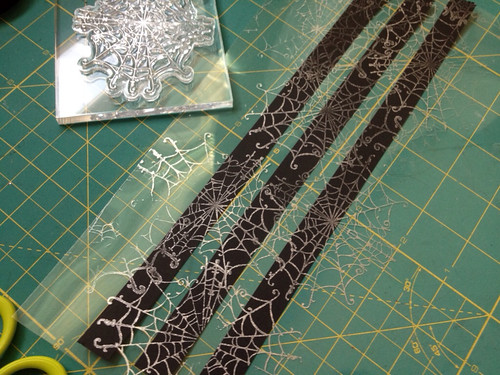
Simple. Quick. How to. Stamp on washi!!!

This was actually done in less than five minutes before I headed to the gym for my morning workout.

Typing this out is probably taking a lot more effort, but the results were so awesome I had to share...

Things you'll need:

  • Your washi tape
  • Acetate better known as transparency sheets (great deals on eBay btw)
  • Your stamp
  • Your ink
The set up
  1. Lay out your tape strips either vertical or horizontal, whatever you prefer on your transparency. (I tried reg paper but it tore up the paper pretty good)
  2. Ink your stamp
  3. Press firmly but not too much or you'll smear your design.
  4. Hold down sheet of transparency as you lift stamp directly up & off.
  5. Let ink dry
  6. When dry move strips of washi to clean transparency.
Silver spiderwebs on plain back washi

Sit back. Admire & use...


9/26/12

QUICK Washi tape holder tutorial...

We collected our supplies at Michaels & Lowes …

  • 1-  blank wooden sign (normally used for a decorative wall hanging)
Pick whatever shape & size you prefer,  but make sure it’s a sturdy thick piece because this will be your base to your washi tape holder and you don’t want it toppling over.
  • 1 – 1 inch thick dowel. I’m assuming you’re making a 6 stack one like mine in the picture so with that said, I got a 36” long dowel.
  •  A drill
  • A 1 inch hole saw
  • Wood glue
  • A hack saw
  • Paint if you prefer.
  • Felt (only if you want a  full felt bottom)  OR You could put little self-adhesive rubber/felt circles/ squares to act as feet on the bottom too. This will help protect the surface you place your washi tape display.  
I used a colored stain from Lowes because I wanted the wood grain to show through a lot more than seeing that layer of paint. I wasn’t very happy with the results, so I think if I make another wood project like this, I’ll be buying the other teal colored wood stain or maybe experiment with some food coloring & then seal it with acrylic after.  I’ll be sure to update if I try this out.

We finished this project in one evening. It took me a couple days to finish the painting portion. I put about 3 coats on & then a clear acrylic after. The only reason I did so many coats is just because it wasn't turning out like I was hoping. 


Determine where you would like your poles to go & mark center.
Tony used my actual washi tapes to figure out  a "nice" spacing to avoid an overcrowding look.
Drill down to 1/2 an inch or 3/4. Try not to drill straight through the base.  

Cut the dowel into six  --6 inch segments. 
I got a little impatient & tried out the wood stain while the dowels were drying. 

Use wood glue & place the dowels into the drilled holes.

Paint. Dry. Use.


Unfortunately, I've already ran out of room & have had to resort to a cheapy container from Daiso, however, if you can practice a little more self control unlike me. This holder should suffice. 


But I still have this one & love love love it! 

Let me know if you have any questions.

shen

9/25/12

FIRST GIVEAWAYS. FACEBOOK. HALLOWEEN. WASHI TAPE.


Wow! It’s been such a long time since my last entry… So I figured I’d do a quick update.
The etsy shop has been on a hiatus, as I finished up a big project.  Finally done! My little sister is turning 18 & she wanted these cute little exploding box invitations. She didn't even want to look at any other option after she saw these.
After researching and help from the BFF these little suckers came to life, piece by agonizing piece. 


little paper cakes inside "exploding boxes"

Invites all boxed up & ready to go. Thank goodness I have a huge dining table. 

I’ve been able to squeeze in little projects here and there in between doing this big project. The etsy shop had a "soft" reopening as I started to post up new items. 

I was able to do a first giveaway on the facebook page, plus a few “appreciation” gift bags for people who were actively sharing my page with their friends. That was a lot of fun! 

I did a type of “I Spy” photo game and the first two to respond won some fun rainbow toe socks. 
Quick back story: I needed measurement for the perfect fit. Requested customer send me pictures and she did this... Do you see her cute little toes? Can you see where/ what she's standing on????
 Had me laughing so hard! 

Total coincidence.. She wore rainbow socks to show me the after... I had already gotten rainbow socks for the winners a few days before. What can I say... Great minds think a like! 


If you want to keep updated please “like” the NEW facebook page www.facebook.com/girlyspazms I'm planning on having a new giveaway again soon! 

The old one was just a "like page" and it was ridiculous to get to... it was like facebook.com/somebunchofgibberish&numbersyadayada....so this new page is a lot more simple... www.facebook.com/girlyspazms 


I've picked up two new obsessions.... WASHI TAPE!!!! and the hubby made me a nice organizer for it. I'll have to put up a short fast tutorial for it when I've got a minute. I love it! Only problem is I already ran out of room, and had to resort to a container from Daiso.

This is the current stash as of today... 9-25-12.. I have 7 rolls on their way to me..
Shut up don't judge me! okay judge me. I don't care. ;D
I LOVE WASHI TAPE!!!!!


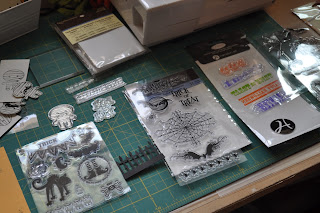
 The other obsession... CLEAR STAMPS. You know the kind that you can keep stored away in neat little pages, and then when needed mount them on an acrylic block... Yeah. A little obsessed with those too.


Just a quick view of some sets of clear stamps I have.


I have so many ideas that I've written down. I started making cards which was one of the things I really wanted to finally dive into. 


Instagram shot of my lil halloween lunch cards I made.
All packaged w/ envelopes made to size. 


And finally October is just around the corner, which means I can break out the halloween decor again!!! yay!!!!!!

Halloween my most favorite holiday aside from Valentine's is coming again! I made the mistake of going on a "quick" Michael's run when they first put out the new things for Halloween, and boy! was my head spinning. "I JUST CAME IN TO GET SPRAY GLUE!!!! DAMN YOU MICHAELS!!!!"    


If you don't remember last years video... Here you go! 


And last to share.... Family art project coming soon..... Dia de los muertos sugar skull decorating.. 


Thanks for reading! What have you been up to?


shen

5/4/11

A tid bit of my crafting history.


I love that my daughter & I are connecting in so many different levels as she gets older & older. I shared this story with her on a quiet afternoon after school while I prepared dinner & the kids finished up their homework. I thought it would be a nice story to share on here too, since it’s been a while.
 Although I opened my etsy shop just 6 months ago & started bringing in some cash for my crafty creations, I actually started way back in high school.  I had a jewelry making class during my senior year. (So although my crafts are all over the place, it all actually started with jewelry, and although I rarely do jewelry pieces now, it's always nice when I am able to put something together.) 
I was allowed to take a few more electives because I had met the requirements to graduate already thanks to the private school I had transferred from.  I was excited because I had always been interested but never had the chance to get my hand on jewelry making. When I was younger, my mom considered all my craft things “junk” so it was really hard to do things, I mainly stuck to drawing & sketching. It was the easiest to hide & avoid criticism from my mom.
Anyways, this class was so much fun! I made jewelry, and got A+++ on projects from my teacher who was so encouraging &  supportive. I’m ashamed to admit it but I can’t remember the name of my art teacher, yet it has been a while so I shouldn't. I started with a B... can I get some points for that at least? ;)
All I remember is that she was a small petite blonde lady, maybe in her mid-30s, who was completely insane about George Clooney. She put together an art show for an upcoming open house that year & asked me to sell my pieces. They all sold that night! AND it was enough to pay for my equipment fee for the class (I think it was about $25) & go towards buying more materials for me.  I was ecstatic that people actually bought my earrings, and necklaces that I had designed. ME!?! A measly little high school senior.
So I started buying my own materials.  See, the reason why I had transferred from private school was because there was a change in household, and I was now living with my dad for a brief time until I eventually rented a room a little later with Tony (my boyfriend back then, my husband now), so I was able to start my little supply of materials without someone coming in & throwing everything out or ransacking my room. I started making more and more jewelry, and started selling at school. I had price tags on each piece, and took cash. I sold out of my backpack during break & lunch. On occasion I would sell in class because the teacher was very lenient & allowed me to. There was even a teacher who asked for custom made pieces.  It was a lot of fun. It made some extra lunch money, and it kept me busy.
Sam smiled as I told her this.  I’m guessing she likes hearing the history of my crafting since she has only seen the recent. I hope you enjoyed this little story as well. 
Quick update on the etsy-business... 
I recently installed the Square app on my phone, and was sent a credit card reader that attaches to the jack of my phone. This will allow me to accept credit cards when I finally set up a booth at a art show/ festival. I also plan to use it at the Pride Parade this year, as I sell some cute rainbow flowers out of my backpack.  Ironically enough, just like high school.
I am also planning on opening a booth at local farmers markets & festivals soon. I'll keep you updated, as for now I'm building up inventory. I have multiple projects going on everyday. The studio is a disaster, and on top of it I'm still filling orders on etsy. 
Life is good. Busy, but good. And the weather has been amazing. I'm hoping it stays like this now. Love the hot sunny weather. Can't get enough of it.

shen 

3/29/11

Upcycled VHS drawers...

A few weeks ago, I posted on freecycle (an online community of people who freecycle- a beautiful think BTW) that I was interested in VHS drawers. VHS?!? You know the old  movie tapes from the 80s &90s.Before CD, DVDS, and blueray!!! Well I was able to track one down & although I want more here is what I did with it. I am quite happy with the results, and I look forward to upcycling more. What do you think?
For a better look click here: http://www.flickr.com/photos/shen_nanigans/5572950918/


shen 

10/31/10

holy moly!!! fabric insanity!

There's a local fabric shop here in San Jose, right down the street from the San Jose Flea Market, which I would like to add is another excellent place to go for crafty goodness. 
The fabric shop is called  Fabrics R us... and oh my goodness, you have no idea how awesome this place can be. Not until I started sewing and really getting into it, that I realize what a haven this place  actually is. Yes, it doesn't have the cute little prints like Joann's or Hancocks. But they have tons and tons of other fabrics, all kinds of silks, dupioni silks, polyesters, cotton blends, fleeces, sequenced fabrics, sari fabric...... the list goes on and on. It's definitely worth the trip, and if you take your time to sort through everything you'll come out on top because the prices are excellent as well. I can't wait to go again. I think I'm gonna make some curtains some time soon. 


Check out their reviews on yelp too:
http://www.yelp.com/biz/fabrics-r-us-san-jose

The specific review that hits the nail on the head is a review by a yelper Marlyn A.. So if you go on yelp and check it out, look for her review. 

Don't expect superduper excellent customer service, you basically need to know what you want because they're not going to cater to you all day. 
 
Here are some pics from my little visit...


The selection is so large that there are a few more shops in this strip mall.

You can always ask for help to get pointed in the right direction.

Tons of notions to sort through, including buttons, lace collars, fasteners.

oo! look at that rosey 3d magenta, now image that in several assorted colors! fun stuff!

A sequenced mermaid's dream! isles and isles!

upholstery fabrics can be found here too!

Ton & Tons of threads and ribbons... 
I also love the fact that they tear the fabric from right off the bolt. There's just something primal and not to mention SEXY about that sound of that awesome ripping of cloth. 

Just thinking about it, I need to go again. oh man... I NEED to go again. 

eeeee! i have goosebumps.  

Happy Halloween!!! 
shen 


10/24/10

Weapon of choice..Staple gun!


So although it wasn't the downpour I was hoping for (down in the south bay at least,) I decided to finally tackle a project I've been preparing for a couple weeks now.  It took me a couple weeks only because I was a tad hesitant on how to go about it. 
Well armed with a staple gun, I went for it. 
Reupholstering the old office chair in the art studio to be more...uh..... FUN!  


#1, 5, 6 Before pics
#2 are the tools needed 
  • heavy fabric (my specific project took 1 1/2 yards, but I bought more because I'm making matching throw pillows at a later time)
  • hammer
  • screw driver or drill to disassemble chair 
  • a small & medium wood chisels
  • heavy duty staple gun & staples
  • fabric scissors
  • A tube of strongstik DAP glue.
#3, 4 & 9 are pics of disassembling the chair. In my case,I took the back off the chair, and unscrewed the bottom (seat part) off the part that has all the adjustment levers. Then I took the arms off the chair. Taking all these pieces apart is well worth it, your fabric will fit around the sections nicely, and neatly. Lastly, using the chisels I used them to pry the backing off the back of the chair. 


#11 & 12 are the seat of the chair. I took off the staples from the bottom liner & since it was in good condition I reused it (if you need to replace yours you should. Although you will rarely see this area, it just gives it a nice finished look). I then stapled the fabric around  (#10) then put the liner back on & stapled that in place to cover the first round of staples. 
Here's a closer look:


first row of staples
turn your work over as you make your way around & smooth out the wrinkles.


With Liner, put a nicer neater row of staples to finish it off. (#8)


# 7, 14, 15 & 17 are all pictures of stapling the fabric into place.

#15 also shows the straight nails that get hammered back into the other back piece. However, I found this part really tricky & ended up using the StrongStik DAP glue which worked out great! If it doesn't work out for your chair use upholstery nails. 

#13 &16 show the finished pieces of the back of the chair together & completed.

#18, 19 & 20 are pics of the finished project. 

Here are some photos of it in natural sunlight...
baby got back!


This took me from around 11:30 to 3 in the afternoon including assembling.  Overall, I'm pretty happy how it turned out. 

More pics later, as I press forward to get the art studio finished & decorated. 

Let me know if you need some clarification, I know this isn't exactly the best explanation.  I was in a hurry to crank out this entry before the end of the night.
shen


10/17/10

A crafty weekend...

So I took  a few days off because I had some online traffic school to finish up.  Thinking I wasn't going to meet the deadline, I took Thursday and Friday off to do it, and just so I had a nice long weekend, I added monday to it. It is now sunday.  I was able to complete the traffic course Wednesday night.
As I watch the Giants vs. Phillies game 2, I am typing out this entry.
I've had a pretty productive weekend considering it started on Thursday. Thursday, being a short day, and I have to get the kids early, I only managed to mail out some orders, and go to Joann's for some fabric therapy. I even had a chance to go to  SJ Japantown, and get some nommy sushi! 
 I was able to re-stuffed my owl pillow.
Made from a few scraps & a favorite sweater from h-school.

It was looking pretty sad and flattened out, painted some frames that will go into the studio and made some clips, and a headband for the etsy shop. And started my dia de los muertos (day of the dead) wreath. The wreath project has me pretty excited. Especially since I'm planning to take the kiddos to a weekend full of the holiday's festivals. One festival is even located in a large cemetery. In attempts to expose them to their Hispanic heritage, I'll be doing more research these next two weeks leading up to Halloween and this special holiday. It was cool seeing the kiddos' interest in a display  at a local store, so now I'm trying to learn more. However, I can't wait until the wreath is done, and I can show you all how it came out.


I attempted to get another printing of the sriracha shirts started last weekend which turned out to be a big fail, and it continued again into this weekend with no luck. I'm going to do a last attempted tomorrow, and then I dunno what I'm going to do. The capillary film is just not picking up the details in the roster part, and it's frustrating the crap out of me. Especially since it seems to be a really popular item, I really want to get the print down and get some shirts cranked out. 


My friday off turned out to be pretty uneventful, as I was busy doing some accounting type things, and not much else. At night I was able to crank out a few hair clips again, work on my wreath, and start on a sewing project, and continued the project on to Saturday afternoon. Saturday night, I worked on a quick project for the studio. A container (old large broth can) wrapped with yarn. Sam decided on the design, and I followed. 


just a hint of color showing through.
Sam's idea.. wish i had orange yarn though.


Sunday, today, was set aside for paintballing, but it finally rained, and we weren't able to play. I worked on my wreath again, and tried out another print with the sriracha print with a big F.A.I.L again...  It's got me really frustrated, but like I said I'm trying out a couple more times this week to see if some of my theories may have contributed to the failure.
I'm still really hopeful.


Tomorrow, Monday, still a day off, I'm hitting up the fabric store again, because I have coupons to use and a shopping list. Stay tuned here and on the etsy shop... I'll be posting up pics of the finished projects soon. 


Hope you are all having a nice weekend too!  What crafty-ness where you up to?


shen

10/10/10

Swirly wall goes bye bye!

So remember the blog from way back... Where I painted my wall with this crazy swirly swirl... I even made a how-to video of it... 


Well, I got tired of looking at it! You don't even understand, it made me feel like the house was chaotic. So I HAD to changed it. Thank goodness.

It was one of my TO-DO's for the summer, and it was completed.
I'm still working on what I want displayed but over-all I'm relieved that I don't have to look at that swirl on my wall anymore.

The swirly madness.

The dining room is almost done, I'm still trying to find the perfect mirror to go opposite this wall, and a nice "buffet" table to go right under it, but with the purchase of my awesome dining table, the swirl just wasn't cutting it anymore.

I had to cover up the swirls first in case a 2nd or 3rd coat was needed.
Lowe's Valspar Eggshell finish in Tawny. Totally perfect.
First Shelf with two tikis  hand-carved from Hawaii.
2nd shelf. The boys putting it up.
3rd & DONE!
I've always wanted to use these IKEA wall ledges.

Really inexpensive, RIBBA picture ledges. 
Taken tonight as I finished up this entry.


I  can display some of my most coveted shells & souvenirs from the beach & beach-side trips. 
But! This just reminds me that I really need to get in gear and put some pictures up. Most of the picture frames I have in the house are blank!


shen


10/5/10

Another Upcycle Project...

The first step is to admit that I have a problem.. Well,I am an addict. I'm addicted to fabric! I love fabric. I can stay at the fabric store for hours and hours. Touching, feeling, and looking and looking with no particular project in mind. I could easily blow all my money at one time. I've gotten better though. I've learned to take pictures with my phone and walk away.  Don't believe me...
Here's proof... I really do stand in the fabric store and snap away, at times I get weird looks from the ladies there, but you know what... bleh! I don't care! This makes me happy.


However, before I learned this money saving habit, I still accumulated quite a stash of cute prints... What did I decide to do with it??? Well I had these old beat up  magazine holders hanging around. Never had the heart to throw them away. I don't know why they were cheap as all heck at IKEA but they stayed around for a while. It's possible, now that I think of it, I had them back at our old condo too. Sheesh!

Anyways, here they are before...


And with some spray on adhesive, and some of my favorite fabric prints. Careful wrapping & cutting. And.... 


Cute right?


 Now in my Art studio?.....


See my mushroom ironing board? I have a matching magazine box :D

So I thought this is a great way for any fabric obsession to show off some of the stash.
To give them a finished look put felt pieces at the bottom.  

Would you buy these if I sold these on etsy? 

I hope that the photo taking of fabric tip helps you too. Keep the pic files in their own folder, and you can always refer back to them when you find a project to do.
Happy Crafting! 

shen